Показ дописів із міткою DIY. Показати всі дописи

четвер, 30 травня 2013 р.

DIY bracelet

Nothing to hard to do, honestly. I'm just so starved for any DIY project (and I have no oppotunity to buy many DIY supplies because I'm travelling and have no space in my suitcase)), that I'm ready to do the easiest one, just to do something.

So here is the bracelet I've made today. Super easy, but looks really cool - I went to have a quick lunch/dinner with my friend and received a few compliments on it.

1

субота, 5 січня 2013 р.

Out and about

I just loved my January 2nd. My friend Luda and I went shopping for some DIY supplies and went for a lunch (and immediately started working on our projects!).

Друге січня у мене було чудовим. Ми з Людою пішли купувати різні гарні штучки для рукоділля, а потім обідати (і одразу ж почали збирати прикраси з щойно куплених деталей!).

Новая папка (563x317)

I'm wearing:
Coat - H&M, thrifted
Scarf - Self made (inspired by the scarf Katie McGrath wears sometimes - here and here)
Jeans - hand-me-downs from my lovely Sasha (we exchange clothes sometimes)
Boots - Doc Martens, a gift from my mom (I guess it's been 4 years or so)
Bag - thrifted
Mittens - street vendor
Belt - b.p.c. (via bonprix.ua)

пʼятниця, 4 січня 2013 р.

DIY - Studded collar

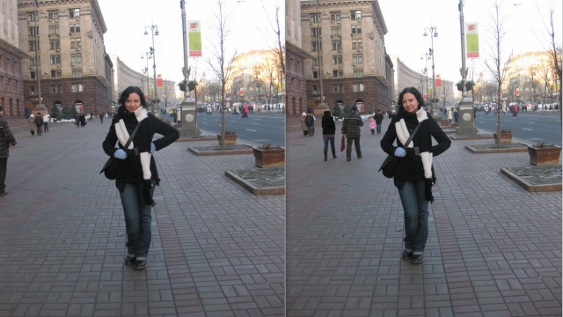
I've wanted to make a studded collar shirt for a while now - I don't have a dress code at my office, but I still have lots of shirts from my previous life of an HR specialist. I want to keep wearing them, but they need some sort of an upgrade to match my new style.
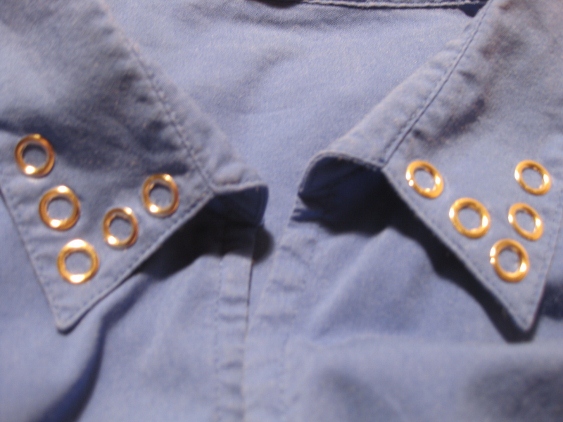
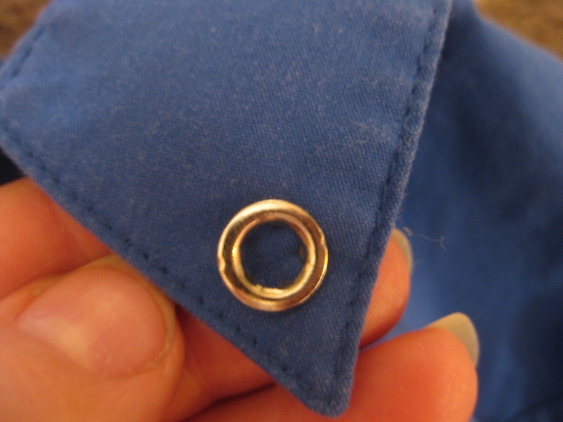
But it's hard to find ordinary studs in Kyiv (I have no idea why). So while I'm waiting for a parcel from ebay, I've decided to work with what I have. I've inharited lot's of cool stuff from my dad, so I've deciced to use this cute round studs (they are parts of ordinary snaps). I love the result - now I have a reason to wear this shirt.

Я дуже давно хочу зробити комірець у заклепки на якійсь зі своїх сорочок. У мене в офісі не має дресс-коду, але від колишнього життя ейчар-спеціаліста в мене лишилось багато сорочок. Я б з радістю їх носила, але хотілося б зробити їх більш цікавими та відповідними моєму стилю.
Але в Києві чомусь дуже важко знайти звичайні заклепки. Тож поки я чекаю на посилку з ebay, я вирішила використати те, що є під рукою. Я успадкувала багато гарних штучок від свого батька, тому вирішила використати такі милі круглі заклепки (це частина звичайних кнопок для одягу). Мені дуже подобається результат - тепер цю сорочку носити дуже приємно)
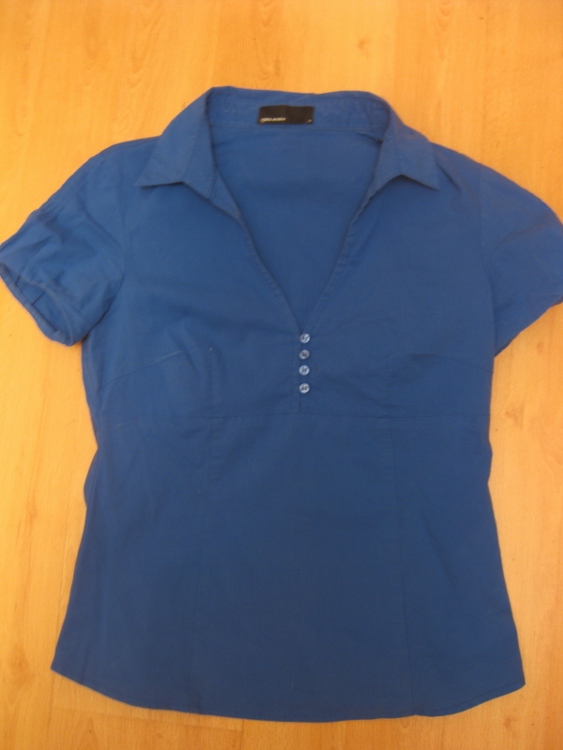
7

You'll need:
- a shirt
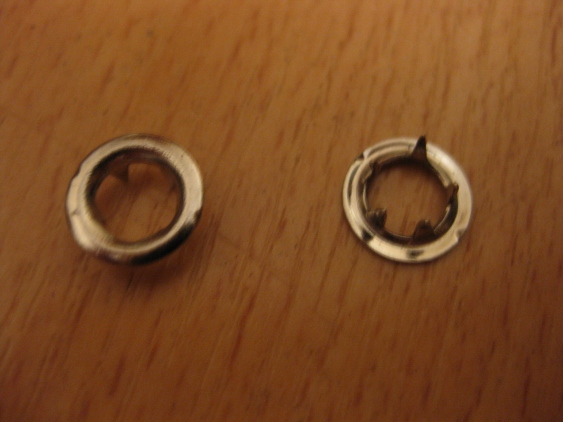
- studs (any studs, actually)
- small pliers for making jewelry
- a little bit a patience and 20 minutes of your time

Вам знадобиться:
- сорочка
- заклепки (байдуже які, насправді)
- плоскогубці для прикрас
- трошки терпіння та 20 хвилин вашого часу

1

2

It's the easiest DIY ever - you just have to fugure out how many of the ctuds you want on your collar and start pinning them through the fabric.

Найлегший майстер-клас у світі, чесне слово - просто визначтесь із тим, скільки заклепок ви хочете прикріпити на комірець і починайте прилаштовувати їх на тканину. 

3

4

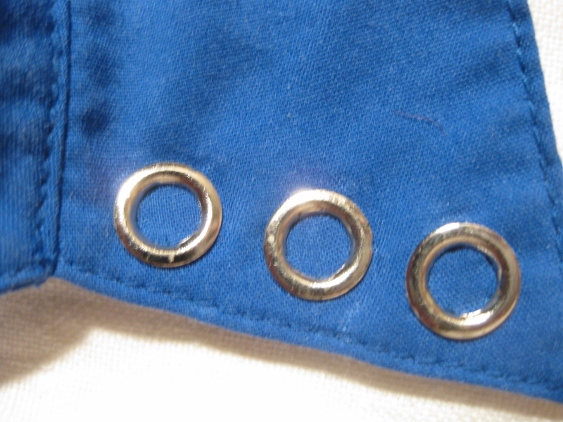
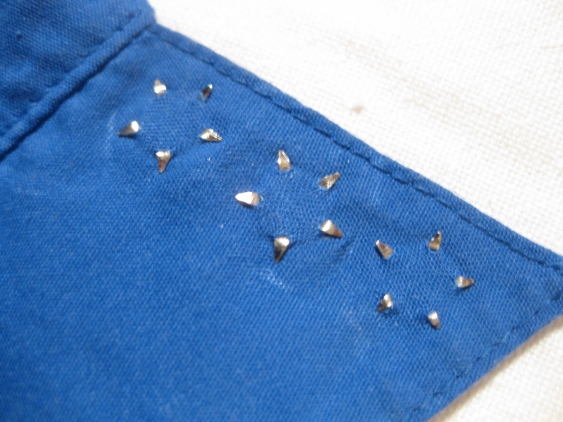
I've decided that I want to create a chevron shape, so I've put five studs on each part of the collar.

Я вирішила, що хочу зробити кут з п*яти заклепок, тож симетрично розмістила їх на комірці 

5

6

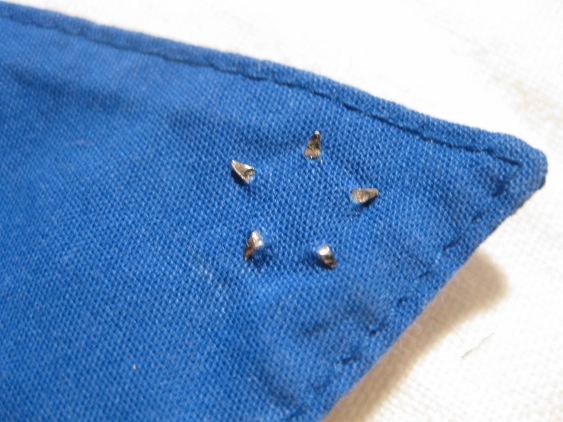
Use pliers to incurve the sharp endings. At this point I actually started liking this side a bit more))

Гострі кінчики загинайте плоскогубцями. Якщо чесно, то на цьому етапі мені почав більше подобатись зворотній бік))

7

Here you go, now your shirt looks much more interesting.

Ну ось, тепер сорочка має набагато цікавіший вигляд.

8

Hope you'll like this simple DIY. As usual, if you'll decide to use it, I'd be really happy to see the pictures)

Сподіваюсь, що вам сподобався цей простий майстер-клас. Як завжди, якщо ви вирішите ним скористатись, я буду дуже рада побачити фотографії.

пʼятниця, 28 грудня 2012 р.

DIY - Tassel earrings

I want to show you the easiest anf the fastest was to make a pair of chic earrings.
I was inspired by lovely Geneva from A Pair and A Spair and her neon tassel earrings DIY project.
I've used different way of doing the earrings and different hooks. It's really easy and they look amazing.
I wore them last night for our corporate NY/Christmas party (we had 80th disco theme, but I didn't want to wear something plastic and tacky) and I've had lots and lots of compliments. So, let's DIY))

Хочу розповісти вам, як дуже просто та швидко зробити пару розкішних сережок.Мене надихнула чудова Женева з блогу A Pair and A Spair та її неонові сережки-китички. Проте я робила сережки іншим способом та з іншими швезами. Робити їх дуже просто і вони мають чудовий вигляд.
Я вдягала їх позавчора на нашу корпоративну вечірку (темою було диско 80-их, але я не хотіла вдягати щось дешеве та пластикове), і отримала багато компліментів. Тож починаємо! 

7


You'll need:
- a pair of tassels (I've bought mine in my favorite fabric store for less then 2 dollars)
- two pretty beads or embellishments (mine were from two ballerina flats bows that my mom's friend gave - she knows I love making my own jewelry)
- two earring hooks
- a pair of sissors
- some glue (I've used glitter glue, but only because I was too lazy to use a glue gun)


Вам знадобиться:
- пара китиць (я купила свої у крамниці тканин за 15 грн)
- дві гарні бусинки чи незвичні деталі (я зняла свої з бантиків, що лишились від балеток - мені їх подарувала мамина подруга, бо знає, що я сама роблю прикраси)
- дві швензи для сережок
- ножиці 
- клей (я використала клей з блискітками, бо не хотілося діставати клейовий пістолет)

1

1. Take your tassels and figure out if they are the right length for you. I wanted them to almost reach my shoulders, so these ones were perfect.

1. Роздивіться свої китички - я хотіла, щоб вони діставали майже до плечей, тому ці були ідеальними.

2

2. Deside on your embellishments. I loved these pretty elements, but they were glued to the bows. Sorry for the ugly picture below) Luckily for me the glue was quite old, so I had no problems taking the embellishments off.

2. Виберіть прикраси. Мені сподобались ці детальки, але вони буди приклеєні до бантиків. Пробачте за негарну фотографію) На щастя, клей був старий, тому я без проблем зняла їх з бантиків. 

3

4

3. Now we have all of the elements for the project.

3. Тепер у нас є всі елементи для сережок.

5

4. Put your embellishments on yout tassels. If you're using some pretty beads, you an just put it on the tassels' strings. I've just put them like that and squized a little.

4. Причепіть прикраси до китиць. Якщо ви використовуєте намистини, то просто нанижіть їх на основу. Я просто просунула "хвостики" в основу китиці та затиснула їх.

6

5. Now all you have to do is to is to tie your tassels to the hooks and secure them with some glue.

5. Тепер лишилося лише прив*язати китиці до швенз та закріпити вузли клеєм.

7

6. Voila! You have a pair of really chic earrings. You can make them is as many colors as you like, they are pretty lightweight and they add a great touch to an outfit.

6. Вуаля! Тепер ви маєте пару розкішних сережок. Їх можна зробити будь-якого кольору, вони легенькі та одразу ж роблять кожне вбрання більш цікавим..

If you decide to do this project, I'll be really happy if you show me your works. Just link me to them, I'll gladly visit your blog.

Якщо вирішите зробити такі сережки, я буду дуже рада, якщо ви покажете мені фотографії. Просто лишіть посилання під цим постом і я з радістю відвідаю ваш блог.

понеділок, 29 листопада 2010 р.

DIY - What to do with an old scarf?

1
Well, technically it wasn't a scarf, more of a pareo. I took it with me to the beach for many years, but this tradition sadly was ended this summer. Me and my friends went to the sea for the music festival and few days of camping, and one day I put my sunny pareo in the same pocket of my backpack as the hairbrush. And hairbrush won. Pareo was destroyed and had a lot of holes in it.